|
Journey Down the Anduin (solo)
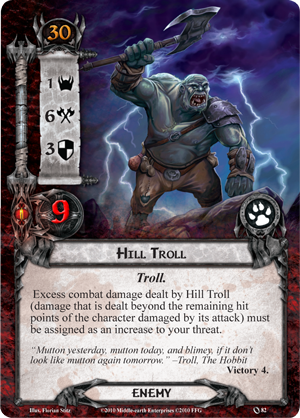
This is a typical scenario with a major villain. In our case a Hill Troll with the engagement cost of 30 (there's one more in the encounter deck).
Perhaps the smoothest way of dealing with the brute is to get ready for him over a number of rounds, during which other obstacles will be met and (hopefully) dealt with. That means starting the game with a rather low threat. Unless you have the best combatants or combat abilities ready, do not pick a deck with a threat of 30 or higher, not even 29 perhaps. It would be much safer to begin the game at about 25 or 26. Willpower strength is of course needed but there are few high threat cards or cards that could accumulate threat; an exception being Brown Lands, a location with the threat of five. Attack strength is a different matter in case of the Hill Troll, unless you want to face him repeatedly, you will require an attack that can strike through his nine hit points and three defence strength. And if you want to withstand his attack strength of six, you'll need some defender to do so. Plus the chumps are more problematic as the excess damage eats into your threat. Healing is quite nice here since there are three copies of Necromancer's Reach (an infamous card of the core set scenarios) that damages exhausted characters. Evil Storm is much less of a threat unless your threat is high, which you try to avoid in the first place. Beside the above, the most potentially deadly treachery in the pack is Pursued by Shadow. If you have A Test of Will in your hand, try to save it for this card, unless you are committing most (if not all) of your characters to the quest. Shadow effects are nothing terrible really. Undefended attacks can be dangerous due to the shadow on Dol Guldur Orcs (and the Wargs). Wolf Rider can be another unpleasant suprise. Location control is very important. It is here where Northern Tracker earned much of his fame in the past. No matter if the East Bight prevents you from travelling somewhere else, you just explore the other locations with Northern Tracker(s). If you have him (or Asfaloth), you will always be wanting to reveal more locations as they are quite harmless beside the threat they could accumulate. Attacking the staging area is especially nice during this quest. One can notice why Spirit got a head start when looking at the aspects of this quest alone. Reducing threat, taking care of locations without travelling to them, and enemies that jump back to the staging area, like the Wargs. Well, Dúnhere doesn't mind that at all. And for the core set players, he should be an obvious choice along the Anduin. Preventing enemy attacks is of course important, especially against the Hill Troll early. But it is useful against the Wargs also as it will prevent them from running back to the staging. The best of the direct damage category is perhaps Thalin's ability, since it will take care of the pesky surging Eastern Crows. But there have been times when Gondorian Spearman was able to finish of a Hill Troll (Gandalf has usually played part in that). Action advantage is probably no more advantageous here than anywhere else. The enemies can surge a bit in the beginning and of course it may be important to both quest and attend to the Troll, which is why the core Aragorn used to be so great. This is a core set scenario, and one should be able to beat it with the cards from the one box. So if you don't want to use any of the show-cased decks, here is a different tip for you: think of Rohan, think of the following... Dúnhere, Éowyn, Théodred; A Light in the Dark (2x), A Test of Will (2x), Beorn (1x), Celebrían's Stone (1x), Dwarven Tomb (1x), Ever Vigilant (2x), Faramir (2x), For Gondor! (2x), Fortune or Fate (1x), Gandalf (3x), Grim Resolve (1x), Guard of the Citadel (2x), Hasty Stroke (2x), Lórien Guide (3x), Northern Tracker (2x), Sneak Attack (2x), Snowbourn Scout (3x), Son of Arnor (2x), Stand and Fight (3x), Steward of Gondor (2x), Strength of Will (2x), The Favour of the Lady (2x), The Galadhrim's Greeting (2x), Unexpected Courage (1x), Valiant Sacrifice (2x), Wandering Took (2x). Escape from Dol Guldur (coop)
This is a very specific quest for the fact that one of the players will end up with a crippled game experience, or at least the game's beginning. It presents various challenges.
Threat management, however, is not one of them. Unless you play too long and run out of time, this is not a problematic quest in terms of the threat level rising out of the ordinary. Willpower strength is another matter, entirely. In the beginning, you'll need to quest like a madman (in 2-player games that is, not to mention the doomed solo attempts) to overcome the obstacles. The opening odds are tough and one shall need a good base attack out of the box to get rid of some of the many enemies that usually engage early on. There's a major villain too, a Nazgul of Dol Guldur, and a few others that will need an attack of 6 or more to get rid of. You won't usually need a defender of five or six, you just need one that is able to perform repeatedly (like the Tactics heroes Beorn or Boromir), or several of those. Chump blockers are a very good option here, since there's nothing that should remove them from their duties before their sacrifice (the Nazgûl's effect could be the only exception). The swarm of enemies can partly be helped by a sufficient healing which also helps against the Necromancer's Reach. Resource management is especially important here as the player with a hero captured will likely be in want for resources. Dol Guldur is one of the quests that has conditions attachments revealed from the Encounter deck. If you cannot cancel the treachery, having Miner of the Iron Hills is hardly a bad idea. The conditions aren't in fact that terrible now but for the core set times, Caught in a Web was a proper nightmare. Shadows of Dol Guldur must truly be terrifying. But its shadow effects are not. The locations are quite common (if not as plentiful as enemies). Exploring them without travelling to them is the key. Staging area attacks are harder to be made against the enemies here, as most of them have very low engagement costs. And those that don't, have rather higher defence values, so the core set Dúnhere without the help of non-core-set attack boosters, will have little luck and joy slaying the beastly things. Enemy attack prevention is particularly useful against the Nazgûl, as it will prevent its potential shadow effect from resolving (and thus a character from being discarded). Direct damage works very well here. Thalin and Gondorian Sperman will already have a good chance; add Spear of the Citadel, Goblin-Cleaver, Fresh Tracks, Haill of Stones, or Expecting Mischief from the latter expansions, and many of the Sauron's servants will fear to come anywhere near you. Action advantage is extremely helpful in this scenario, as its early rounds are even more essential than usually. Be ready to throw anything you've got as the encounter deck will try to do the same to you. Since this is still a warm-up, though hard enough for beginners, the decks below come off two core sets (and nothing else), considering the two players involved... Glorfindel, Beravor, Legolas; Blade Mastery (3x), Blade of Gondolin (3x), Dark Knowledge (2x), Daughter of the Nimrodel (3x), Erebor Hammersmith (3x), Feint (3x), Forest Snare (3x), Gléowine (3x), Gondorian Sperman (3x), Henamarth Riversong (2x), Horn of Gondor (2x), Lórien's Wealth (3x), Miner of the Iron Hills (3x), Protector of Lórien (3x), Quick Strike (3x), Radagast's Cunning (3x), Secret Paths (3x), Stand Together (2x). Théodred, Aragorn, Éowyn; A Test of Will (3x), Celebrían's Stone (2x), Dwarven Tomb (2x), Ever Vigilant (3x), Faramir (2x), For Gondor (3x), Gandalf (3x), Hasty Stroke (3x), Northern Tracker (3x), Sneak Attack (3x), Snowbourn Scout (3x), Son of Arnor (3x), Stand and Fight (3x), Steward of Gondor (3x), The Favour of the Lady (3x), The Galadhrim's Greeting (3x), Unexpected Courage (2x), Wandering Took (3x). Click to set custo
comments powered by Disqus
m HTML
|
